Intro  When you start playing around with the cloud (say with Amazon Web Services - AWS) you first get used to the AWS console. You see that you can do lots with that: create and terminate server instances, storage, load up different OSs, view the console, monitor health, set up security groups, do auto-scaling, and so on. After a while, you realize that in order to do something real and repeatable with more than one server in the cloud you need to be writing reusable scripts, so that you can easily terminate and restart the set of servers, and get them to talk to each other correctly. This is what I did. I built an intricate set of bash scripts for each of my servers (each of which had a different purpose for my application). The Bash World  These scripts used
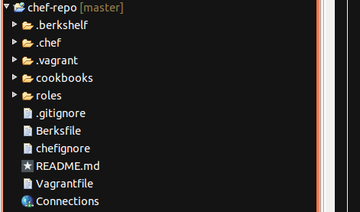
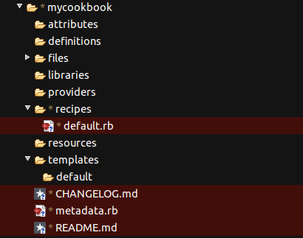
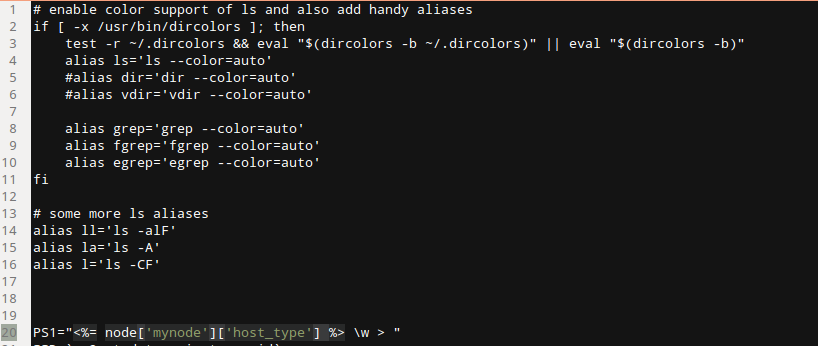
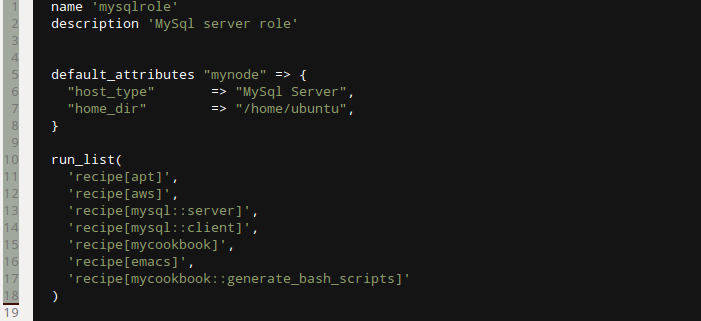
Then I came back to this about 6 months after I had used it. Ugh! OK, tell me I am a rubbish scripter/commenter etc, but I didn't like what I saw. I had forgotten why I had some things in the scripts and I was not sure about the way it all got orchestrated etc. OK, so after a few hours careful reading and trying out I managed to get back into it, but I didn't feel good about this stuff at all. That is just the one part of why I was not totally happy. It was also time to upgrade to the next rails version (you know, security patches and the like) and in order to make my life easier (huh!) with the scripting I had resorted to (I didn't say that before, did I) custom AMI images for each of my server types (I had three server types). So I had behind the scenes carefully crafted my OS plus requisite software libraries (you know, all that funky apt-get install stuff). And anyone who knows rails/ruby also knows that it is a mighty headache getting the right ruby and rails versions installed via ubuntu. In fact, you have to be very careful and use a nice tool like rvm to help you install this properly. Anyway, the point of all that is to say that I had a further maintenance headache with this script approach, which was that I basically had to reincarnate teh AMI images every time I upgraded. Who knows whether the other scripts would still be good after that. Also, what a pain to test all this in a staging environment, since I would have to be copying different scripts for staging in order to ensure I was not accidentally being live with data or web. Basically, this simple cloud stuff was getting a bit too complicated. The Chef World  Enter stage right: chef, your friendly neighbourhood configuration management action hero! Chef is nice, because is it based on ruby (I like ruby). But don't let that put you off: ruby is easy to learn. By the way, anyone calling themselves a programmer should NEVER be afraid to learn a new language. You should be jumping at the chance. The more languages you are familiar with, the easier it becomes to learn a new one. Just like with speaking languages. It is nice to be able to structure your configurations using a proper coding language. This is what DevOps is all about. More power to the developer! Anyway, this blog post is about the concepts of Chef. It is not THAT easy to get your head around it, and it took me some time, so I want to try to make it easier to understand. It is easier if you learn it in the order you will probably be using it. Once you have installed chef-repo and knife on your local machine (I will not tell you how to do that, since opscode has good material here - check out opscode's instructions) and opened your favourite IDE to edit the files (my workstation runs ubuntu linux, and I use aptana studio, which is based on eclipse. Mac and Windows users will have their own favourites), you will see the following directory tree: You need to understand cookbooks and roles. First cookbooks. In the cookbooks folder you will see a list of all the cookbooks you have. Now, initially that will probably be empty. So you need to create one. Do this with the knife command: $ knife cookbook create mycookbook then you will see the following directory structure under mycookbook: Within this, the "recipe" folder will contain all the magic instructions for building servers. "default.rb" is a ruby file that represents the recipe that always gets run if you do not specify explicitly in your roles (we will come to Roles later). Within the recipes folder you would be creating new ruby (.rb) files in order to structure your code better. So, you may generate a "generate_bash_scripts.rb" recipe, which is focused purely on that, while it may be good to have a "set_up_web_server.rb" recipe for dealing with the config settings for the web server (if the role requires one). You get the idea... There are other wonderful things in here too. "templates" is really good. in this folder you keep all the templates for files you want to generate on-the-fly, probably using parameters that you have fed chef for this particular deployment. So, you could create a file called ".bashrc.erb" say in the templates -> default folder. (Note: .erb is a file that could, but does not have to, contain embedded ruby). The .bashrc.erb file might look like this: As you can see, it is all what you would expect from a .bashrc file, apart from the <%= node[:mynode][:host_type] %> piece That is a bit of ruby (between the <%= .. %>) which in fact is a hash array containing a string that gives you a nice prompt label. Since it would be different for each host type, it seems right to put it in as a variable to be specified up top in the deployment. You are now wondering where it gets set - wait a bit and I will tell you. First how do we use this template thing? Well, you get the recipe to use the template to build the .bashrc for you - logical! So, over in my "generate_bash_scripts.rb" recipe file, I will have the following: And this has the effect of generating me a .bashrc file in my home directory (we set that using top level variables too) on the server. The command "source" is defined by the chef DSL and basically preprocesses the ruby embedded in .bashrc.erb resulting in a normal .bashrc file. So that's templates for you. There are other cool things you can use to organize the chef cookbook, but we are going to restrict ourselves in this post to what is needed to get going. So that is enough for the cookbook. All we are doing here is generating a .bashrc file with a particular prompt setting for our host type. What is next? We need to have some way of telling chef what cookbooks and recipes any given server is going to be using, to get itself started. So far we have found out how to generate a custom .bashrc file for a server that is already set up with all the software we need. So how does it become that server in the first place? Well, chef has a huge community of contributors behind it (as well as its own developers) that is constantly producing new cookbooks and updating them. Most of these are to be found on the opscode community site (see cookbooks) and on github. Knock yourself out. it is very impressive. If you want a MySql server built for you, then you can go ahead and load up some cookbooks into your chef server. Just a word about that. The chef orchestration needs to be managed from somewhere. You can, if you wish, create your own chef server (called chef-solo) running in your own space (PC, cloud, wherever) but you need to manage it yourself. You may be fine with this. It is free and opensource. I prefer to leverage the chef enterprise server that is managed by OpsCode. It is free to use this facility so long as you keep the number of active nodes at or below five. It is a little pricey though once you go up. You need to decide, but I thnk for trying all this out, there is no reason not to use the opscode server. It will save a lot on tricky installs I bet, and you know you are using the latest version of the chef-client (that is the beast that talks to the chef server from the client - the server you are building). So, you have an account on the chef enterprise server (easy), you log on and take a look - you have this kind of thing (note I think they may be upgrading their UI soon) On the Cookbooks tab there will be no cookbooks, because you need to upload them. And you need to upload all the cookbooks you will use for your servers. So how do you do this? Well, say you want to use the mysql cookbook (which contains both the server and client recipes inside it). You go to opscode community and take a look at what it offers. If you are happy you can return to your command line and type: $ knife cookbook site download mysql Downloading mysql from the cookbooks site at version 4.0.10 to /home/chef/chef-repo/mysql-4.0.10.tar.gz So now you can tar zxf this cookbook into your cookbooks folder. Finally, you need to upload it onto your own chef enterprise account: $ knife cookbook upload mysql and you will see it listed as one of the cookbooks on the opscode tab above. So now the final concept for this post, to join up the dots. The Roles. You want to create a server which has the nature of a MySql server. That is what it is going to do, among other things. It needs to run the mysql server recipe then. But you also want it to run your own custom set-up recipe, which you wrote in mycookbook/mysql.rb, and you also want it to run that great recipe mycookbook/generate_bash_scripts.rb so it has a nice prompt (and you know what it is when you ssh into it later). Well, to do this you need to define a run-list, which consists of a series of recipes to be executed in the order given. The best way to do anything with chef is to write it in some file first, and then tell the chef server about it. We advise you to define your roles this way. Let's create a file called "mysqlrole.rb" in the folder "roles": You see that we have also defined the two parameters we used in the recipe: host_type and home_dir as default attributes for the node 'mynode'. These are available as global values in our recipe code. We also tell it to run the apt recipe (a useful one to ensure that on ubuntu linux the apt-get installer is up to date, and emacs, because I like to use emacs on linux. We specify particular recipes in cookbooks using the "::" notation (ruby notation to pick out a class member), and if none is specified that means use the default.rb recipe.
Tell chef about this role this way: $ knife role from file roles/mysqlrole.rb Check the chef enterprise server - you should see the role now listed under the Roles tab. Oh, and make sure you have uploaded all the recipes you need (including the one you wrote). $ knife cookbook upload mycookbook So, ignoring all the rest that Chef has to offer us, for now, that is all you need to know to set up the instructions for spinning up a server. The way you actually spin up a server is quite easy. Say you are using AWS, there is a command you can use just for that: $ knife ec2 server create --node-name "my-mysql-node" -r "role[mysqlrole]" --flavor m1.small --image ami-e766d78e ok - there are actually some more options you will want to specify here (like ssh keys), but you can see the principle: knife goes ahead and spins up this ec2 instance and as it boots up it will download the role mysqlrole as defined by you on the enterprise server, and run all the stuff that needs to be run to make it that perfect little database server. You will then be able to ssh into it, see the lovely "Mysql Server >" prompt, and be sure that the baby is born... More about Chef in future posts. This was just to get you going. I hope you can see how we are moving into a more controlled deploy-config-run world with this kind of service.
0 Comments
|
AuthorFrank Smieja ArchivesCategories
All
|
Our Services
|
Company
|
© Smartatech Ltd, 2015 | Curramarrow Rushetts Road, Sevenoaks, TN15 6EY, Kent, UK | [email protected]



 RSS Feed
